 | This page is still under construction. If you follow any of the advice here, you do it at your own risk. |
My Linux
|  |
Hardware
The PC I'm running Linux on is quite high spec and should be able to run most applications without any problems. Rather than buying a ready made system, I built my own. The parts I choose are fairly popular, so the setup procedure described on this page should apply to a lot of people. The following image shows the PC and it's parts. If you think my PC looks really good and you would like it on your desktop, then you can download a picture of it here.
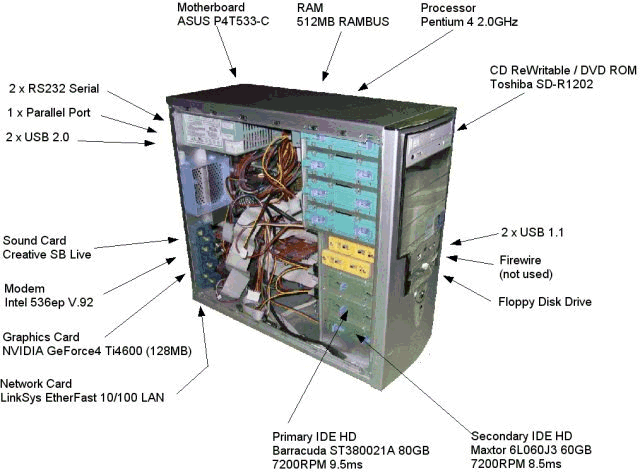
Other parts of the system, which are not shown above include:
 | USB Mouse (Belkin) |
| PS/2 Keyboard |
| LG Flatron L1510S LCD (15 inch) |
| Freeserve Anytime Internet Connection (56K dialup) |
| Deskjet 690C Parallel Port Printer |
The Kernel
At the moment I'm running Kernel version 2.4.18. All versions of the kernel can be download as a tar ball (source code) from www.kernel.org. Once you've downloaded the kernel it just needs configuring and compiling. Rebuilding the kernel not only allows you add extra support to the system (e.g. USB and networking), but it also allows you to remove any unesecary support (e.g. SCSI and PCMCIA), which should hopefully result in a more optimised and reliable system.
Recompiling the kernel may sound a daunting task, but it's really quite straightforward. The following steps give an idea of what is involved.
| 1) | Download the tar ball from www.kernel.org and then extract it to the /usr/src/ directory. This should then create a new kernel source directory. |
| 2) | Change to the new source directory and remove any unwanted files with the following command sequence (this is not always necessary): |
| make-kpkg clean | |
| rm -rf ./debian | |
| rm -f stamp-* | |
| 3) | Before compiling the kernel you need to configure it. There's different ways to do this, but the easiest is to type |
| make menuconfig | |
| which should present you with a menu like the following. | |
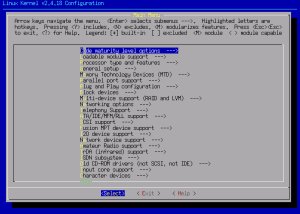 | |
| Go through every menu choice and make the relevant selections. The help text associated with each option is usually quite good and if your not sure whether to select the option or not, just go with the help texts recommendation (although it is better to find out exactly what the option does). No matter which way you choose to configure the kernel the result will always be a .config file. A copy of my .config file can be downloaded here (note that this file is always changing). | |
| 4) | When you have finished configuring the kernel you need to compile it. If you've installed the kernel-package package (that's not a typo) then you only need to enter: |
| make-dpkg -rev Custom.N kernel_image | |
| make-dpkg -rev Custom.N kernel_headers | |
| In the above examples the character N should be replaced with a revision number of your choice (this makes it easier when you end up compiling the kernel multliple times). If you haven't installed the kernel-package package then you can still complile the kernel, just look at the readme file (looking at the makefile helps as well). When the make-kpkg commands have finished you should have a kenerl source and kernel headers package in your /usr/src/ directory. | |
| 5) | To install the newly created Debian packages just use dpkg (using the filename of your packages): |
| dpkg --install kernel-image-2.4.18_Custom.1_i386.deb | |
| dpkg --install kernel-headers-2.4.18_Custom.1_i386.deb | |
| 6) | A symbolic link to the kernel source should now be created: |
| rm /usr/src/linux (might not be necessary) | |
| ln -s /usr/src/yourkernelsourcedirectory /usr/src/linux | |
| 7) | Assuming everything went without error, you only need to reboot your system for the new kernel to come into effect. Once the system has rebooted you can check the kernel version with: |
| uname -r |
MODEM
My modem is a Windows Modem, which is not an ideal modem for Linux. However, due to the popularity and low price of WinModem's, some Linux drivers have been developed (see www.linmodem.org for more information).
The chipset of the modem I'm using is manufactured by Intel and is a 536ep PCI type. The driver for this particular modem (INTEL536-4.68.tgz) can be downloaded in source form directly from Intel. Once you've downloaded and extracted the driver, just follow the instructions in the readme.txt file to compile and install it.
Once the driver is installed you can use wvdial to connect to your ISP. The only changes I needed to make to the system where to /etc/wvdial.conf and /etc/ppp/pap-secrets. If you fail to make the relevant changes to pap-secrets you will be able to connect to the ISP, but you wont be able to login. The changes I made are:
The Intel driver compiled without any errors. The installer script wouldn't run properly, but by following the alternative installation instructions in the readme.txt file I was able to install the driver. Because it's a WinModem I was expecting some performance loss while running it in Linux, but so far it performs as well in Linux as it does in Windows. In both operating systems the modem downloads data at around 5.5KB/s (it's only a 56Kb dialup connection). On a couple of occasions the modem has disconnected for no reason, but this is quite a rare occurence.
I had originaly tried the modem with a 2.6.8.1 kernel. Although the driver I used was designed for the 2.6 kernel and the 536ep modem, I could not get it to work. I didn't spend much time investigating why and I had made some changes to the linux system which may have been the cause of the problem.
Graphics Card (NVIDIA GeForce4 Ti4600 128MB)
The driver for the graphics card can be downloaded from NVIDIA. To install the driver just follow the instructions that come with it. Make sure you have created the symbolic link to your linux source code (/usr/src/linux) before installing the driver. The driver should then install without any errors.
Display Manager
For a display manager I'm using GDM 2.4. The main reason for choosing this particular display manager was the amount of high quality themes that are available for it. The best place to get GDM themes from is art.gnome.org. The theme I'm using is GDM-BeeAtWork, but with a different background image. The background image I've used can be downloaded from www.jerksworld.com.
To install the theme just use gdmsetup while logged in as root. If your system doesn't have gdmsetup then your version of GDM maybe to old. My original version of GDM was 2.2.5.5, which didn't have the necessary theme support. A backport version of GDM 2.4.1.6 can be downloaded from mirror.raw.no. The best way to get it and all of its dependencies is to use apt-get in the following way:
| 1) | Connect your Linux system to the Internet. |
| 2) | Edit your /etc/apt/ file so that it contains the following entry (you might need to remove some of the other entries): |
| deb http://mirror.raw.no/ gnome2.2/ | |
| 3) | Run apt-get update |
| 4) | Run apt-get install gdm |
The only other change that needed to be made to the system was to add the Sawfish window manager to the sessions menu. To do this, just create a file called /etc/X11/gdm/Sessions/Sawfish and put the following lines in it:
#!/bin/sh
exec /usr/bin/sawfish
The final thing to do is change the permissions of the new file to 755 (e.g. chmod 755 Sawfish).
Window Manager
As has already been mentioned, the Window Manager I'm using is the super fast Sawfish. This window manager is well suited for small LCD's as it does away with the usual menu bar.&nsbp; Sawfish also has the advantage of loading almost instantly.
To set the background image in Sawfish create a file called ~/.sawfishrc and put the following text in it:
(require 'sawmill-defaults)
(require 'sawfish.wm)
(system "xv -root -quit -max /usr/share/wallpapers/default_blue.jpg")
The above assumes you have the XV image viewer on your system. If you don't then either use something else or use apt-get install xv.
Linux Tips
I'll put any useful Linux tips here.
| 1) | Capturing the Login Screen |
| To create screen shots of the login screen wait for the login screen to appear and then press Ctrl+Alt+F1. This should present you with a console login. Login as root and then enter the following: | |
| chvt 7; sleep 5; XAUTHORITY=/var/lib/gdm/:0.Xauth DISPLAY=:0.0 import -window root /root/screen.png | |
| Some websites quote the above command but replace /var/lib/gdm/ with /var/gdm/. You should check which you need before running the command. If you want to know how it works just refer to the man pages. |